- 什么是 Textures(纹理)
- 如何加载 Textures
- UV unwrapping
- Transforming the Texture 纹理变换
- Filtering and Mipmapping
- 纹理的格式与优化
- 小结
本系列为 Three.js journey 教程学习笔记。
什么是 Textures(纹理)
纹理是覆盖在几何体表面的图片,当把纹理按照特定的方式映射到物体表面上的时候能使物体看上去更加真实。
可以前往 https://3dtextures.me/ 寻找合适的纹理贴图,这个网站是提供了具有漫反射、法线、置换、遮挡、镜面反射和粗糙度贴图的免费无缝 PBR 纹理。接下来我们将使用这个门板纹理贴图
PBR 原则是基于物理的渲染(Physically Based Rendering),基于与现实世界的物理原理更相符的基本理论所构成的渲染技术。PBR 已经成为一种标准,很多设计软件和库都在使用,如 Three.js, Blender 等
如何加载 Textures
TextureLoader
参考 Threejs 文档 Texture 章节
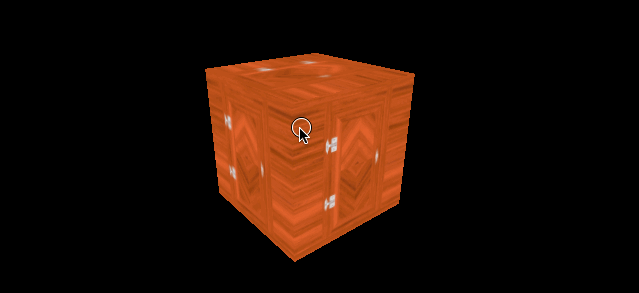
例如我们将一张门的图片作为纹理,需要如下代码
图片为

/**
 * Textures
 */
const textureLoader = new THREE.TextureLoader()
const texture = textureLoader.load('../assets/textures/door/color.jpg')

...

const material = new THREE.MeshBasicMaterial({
  map: texture,
})
效果如下

LoadingManager
其功能是处理并跟踪已加载和待处理的数据。如果未手动设置加强管理器,则会为加载器创建和使用默认全局实例加载器管理器。参考 Threejs 文档 LoadingManager 章节
当我们需要加载很多素材、模型的时候,需要这些资源的加载进度,这时 LoadingManager 就会很方便。现在我们使用 LoadingManager 加载上一个纹理。代码如下
const loadingManager = new THREE.LoadingManager()
loadingManager.onStart = () => {
  console.log('onStart')
}
loadingManager.onProgress = () => {
  console.log('onProgress')
}
loadingManager.onLoad = () => {
  console.log('onLoad')
}
loadingManager.onError = () => {
  console.log('onError')
}
const textureLoader = new THREE.TextureLoader(loadingManager)
const texture = textureLoader.load('../assets/textures/door/color.jpg')
console print
onStart
onProgress
onLoad
加载多个纹理时,onProgress 可以展示出进度
const loadingManager = new THREE.LoadingManager()
loadingManager.onStart = (url, itemsLoaded, itemsTotal) => {
  console.log(`Started loading file: ${url}.\nLoaded ${itemsLoaded} of ${itemsTotal} files.`)
}
loadingManager.onProgress = (url, itemsLoaded, itemsTotal) => {
  console.log(`Loading file: ${url}.\nLoaded ${itemsLoaded} of ${itemsTotal} files.`)
}
loadingManager.onLoad = () => {
  console.log('Loading complete!')
}
loadingManager.onError = (url) => {
  console.log(`There was an error loading ${url}`)
}

const textureLoader = new THREE.TextureLoader(loadingManager)
const colorTexture = textureLoader.load('../assets/textures/door/color.jpg')
const alphaTexture = textureLoader.load('../assets/textures/door/alpha.jpg')
const ambientOcclusionTexture = textureLoader.load('../assets/textures/door/ambientOcclusion.jpg')
const heightTexture = textureLoader.load('../assets/textures/door/height.jpg')
const metalnessTexture = textureLoader.load('../assets/textures/door/metalness.jpg')
console print
Started loading file: ../assets/textures/door/color.jpg.
Loaded 0 of 1 files.
Loading file: ../assets/textures/door/color.jpg.
Loaded 1 of 5 files.
Loading file: ../assets/textures/door/alpha.jpg.
Loaded 2 of 5 files.
Loading file: ../assets/textures/door/ambientOcclusion.jpg.
Loaded 3 of 5 files.
Loading file: ../assets/textures/door/height.jpg.
Loaded 4 of 5 files.
Loading file: ../assets/textures/door/metalness.jpg.
Loaded 5 of 5 files.
Loading complete!
UV unwrapping
UV unwrapping 是纹理在被放置在模型上的具体对应位置的控制,控制纹理拉伸的位置和方向等。字母“U”和“V”表示 2D 纹理的轴,因为“X”、“Y”和“Z”已经用于表示模型空间中 3D 对象的轴,而“W”(在 除了 XYZ) 用于计算四元数旋转,这是计算机图形学中的常见操作。

打印几何体的uv坐标,可以看到
const box = new THREE.BoxGeometry(1, 1, 1)
const material = new THREE.MeshBasicMaterial({
  map: colorTexture,
})
console.log(box.attributes.uv)
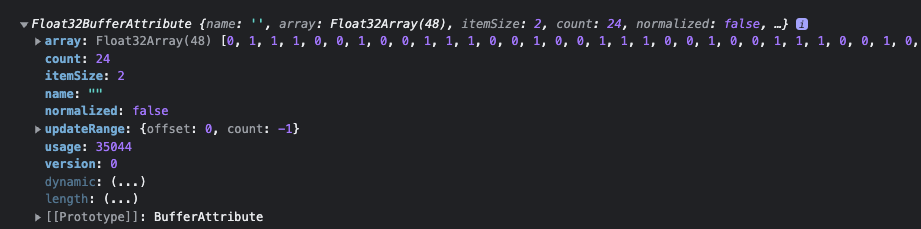
其中 array 为 Float32Array,uv 坐标两两一组,另一个属性 itemSize 为 2 也是说明这一点。这些uv坐标描述了纹理是如何放置在几何体表面的。
上面的 UV 坐标是 Threejs 生成的。如果你创建自己的几何体,也需要自己明确 UV 坐标。如果你使用其他 3d 软件创建几何体,也需要在软件中设置 UV 展开后的贴图与模型的 UV 坐标。
关于 UV 纹理贴图,就先了解到这里,后续需要时会深入学习。
Transforming the Texture 纹理变换
repeat 重复
给纹理设置如下属性
const colorTexture = textureLoader.load('../assets/textures/door/color.jpg')

colorTexture.repeat.x = 2
colorTexture.repeat.y = 3
效果如下
可以看到并没有 repeat,而是边缘的像素被拉伸了,需要再设置属性
const textureLoader = new THREE.TextureLoader(loadingManager)
const colorTexture = textureLoader.load('../assets/textures/door/color.jpg')

colorTexture.repeat.x = 2
colorTexture.repeat.y = 3
colorTexture.wrapS = THREE.RepeatWrapping
colorTexture.wrapT = THREE.RepeatWrapping
效果如下

其中 wrapS 用于指定包裹模式
.wrapS : number
这个值定义了纹理贴图在水平方向上将如何包裹,在 UV 映射中对应于 U。
默认值是 THREE.ClampToEdgeWrapping,即纹理边缘将被推到外部边缘的纹素。 其它的两个选项分别是 THREE.RepeatWrapping 和 THREE.MirroredRepeatWrapping。
ClampToEdgeWrapping是默认值,纹理中的最后一个像素将延伸到网格的边缘RepeatWrapping,纹理将简单地重复到无穷大。MirroredRepeatWrapping, 纹理将重复到无穷大,在每次重复时将进行镜像
.wrapT : number
这个值定义了纹理贴图在垂直方向上将如何包裹,在 UV 映射中对应于 V。
可以使用与 .wrapS : number 相同的选项。
详见文档 Texture
MirroredRepeatWrapping 效果如下
colorTexture.wrapS = THREE.MirroredRepeatWrapping
colorTexture.wrapT = THREE.MirroredRepeatWrapping
offset 偏移
colorTexture.offset.x = 0.5
colorTexture.offset.y = 0

rotation 旋转
colorTexture.wrapS = THREE.RepeatWrapping
colorTexture.wrapT = THREE.RepeatWrapping
colorTexture.rotation = Math.PI / 4
更改旋转中心
colorTexture.wrapS = THREE.RepeatWrapping
colorTexture.wrapT = THREE.RepeatWrapping
colorTexture.center = new THREE.Vector2(0.5, 0.5)
colorTexture.rotation = Math.PI / 4

Filtering and Mipmapping
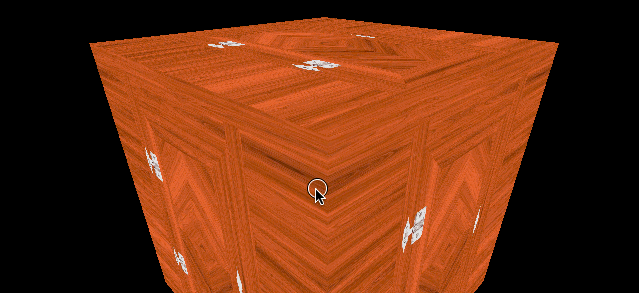
观察上述 gif 动画,可以看出,立方体上表面角度较平的时候,纹理图片被模糊化了,正对我们时又变得清晰。这就是 Filtering and Mipmapping 所做的事情。
在计算机图形学中,材质过滤(Texture filtering)是一种针对一个使用材质贴图的像素,使用临近的一个或多个纹素计算其纹理颜色的方法。从数学上来说,材质过滤是抗锯齿的一种,但它更着重于滤掉材质中的高频,而不像其他抗锯齿技术那样着重于改善边界显示效果。简单来说,它使得同一个材质可以被用于不同的形状,尺寸和角度,同时尽可能减少显示时的模糊和闪烁。
在三维计算机图形的贴图渲染中有一个常用的技术被称为 Mipmapping。为了加快渲染速度和减少图像锯齿,贴图被处理成由一系列被预先计算和优化过的图片组成的文件, 这样的贴图被称为 MIP map 或者 mipmap。这个技术在三维游戏中被非常广泛的使用。“MIP”来自于拉丁语 multum in parvo 的首字母,意思是“放置很多东西的小空间”。Mipmap 需要占用一定的内存空间,同时也遵循小波压缩规则 (wavelet compression)。
可以理解为 Mipmapping 会预先生成一系列图片,在物体旋转时,不同的角度看到不同的图片,用于提高性能,空间换时间。
Minification filter 缩小滤镜
缩小滤镜(Minification Filters)详见文档 Textures
- THREE.NearestFilter 返回与指定纹理坐标(在曼哈顿距离之内)最接近的纹理元素的值
- THREE.NearestMipmapNearestFilter
- THREE.NearestMipmapLinearFilter
- THREE.LinearFilter
- THREE.LinearMipmapNearestFilter
- 默认值,它选择与被纹理化像素的尺寸最接近的两个mipmap, 并以LinearFilter为标准来从每个mipmap中生成纹理值。最终的纹理值是这两个值的加权平均值。
- THREE.LinearMipmapLinearFilter
这些常量用于纹理的 minFilter 属性,它们定义了当被纹理化的像素映射到大于1纹理元素(texel)的区域时,将要使用的纹理缩小函数。
minFilter 当一个纹素覆盖小于一个像素时,贴图将如何采样。默认值为
THREE.LinearMipmapLinearFilter, 它将使用 mipmapping 以及三次线性滤镜。
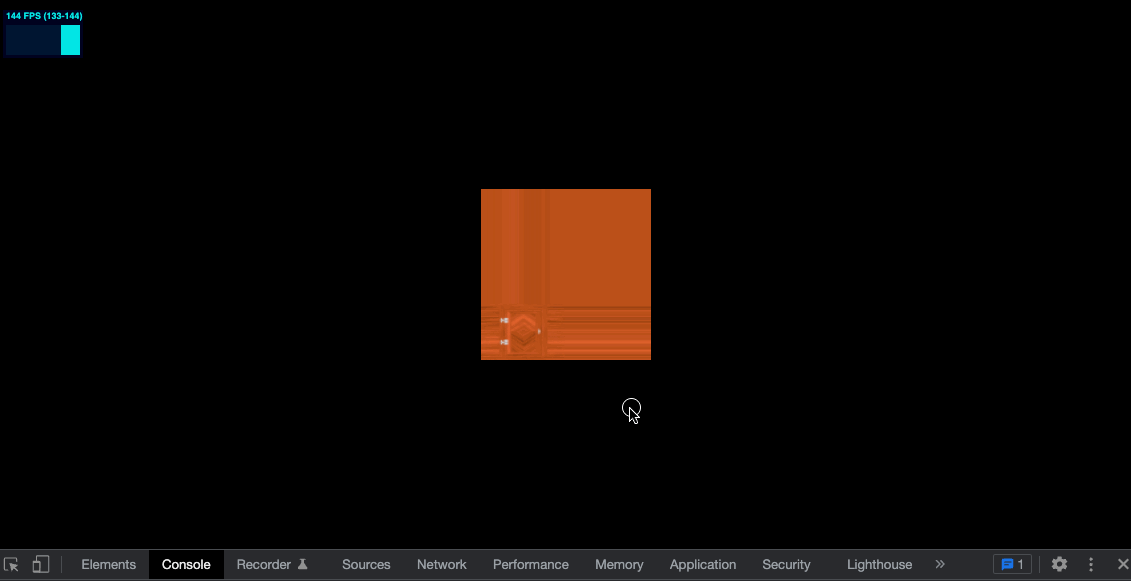
这些过滤算法背后非常复杂,我们试一下 NearestFilter 来看看实际效果
const textureLoader = new THREE.TextureLoader(loadingManager)
const colorTexture = textureLoader.load('../assets/textures/door/color.jpg')

colorTexture.minFilter = THREE.NearestFilter // 清晰锐利

const box = new THREE.BoxGeometry(1, 1, 1)
const material = new THREE.MeshBasicMaterial({
  map: colorTexture,
})

// Object
const cubeMesh = new THREE.Mesh(box, material)
scene.add(cubeMesh)
效果如下,可以看到顶部纹理图片变得清晰锐利
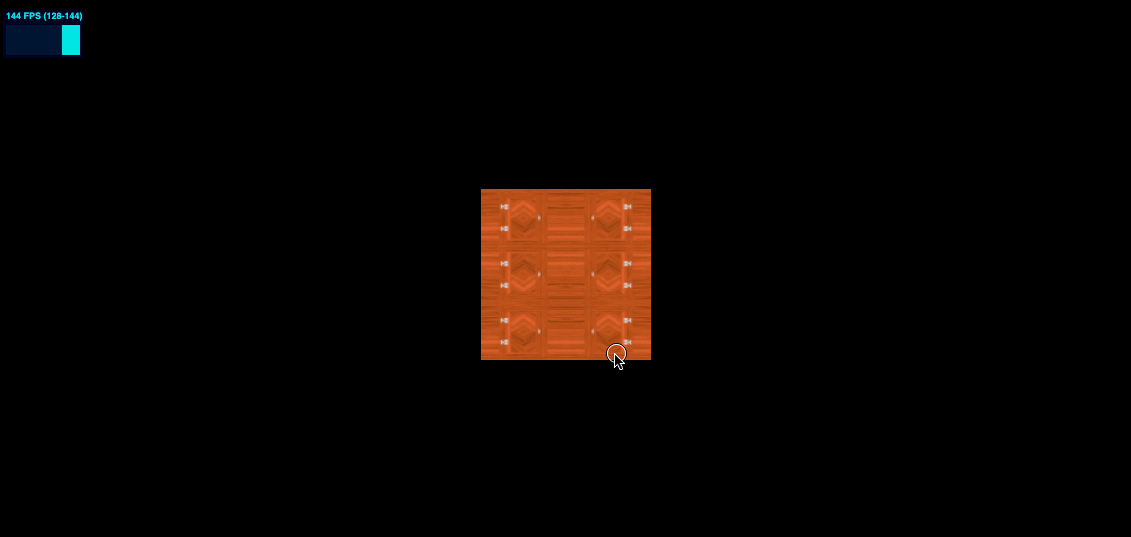
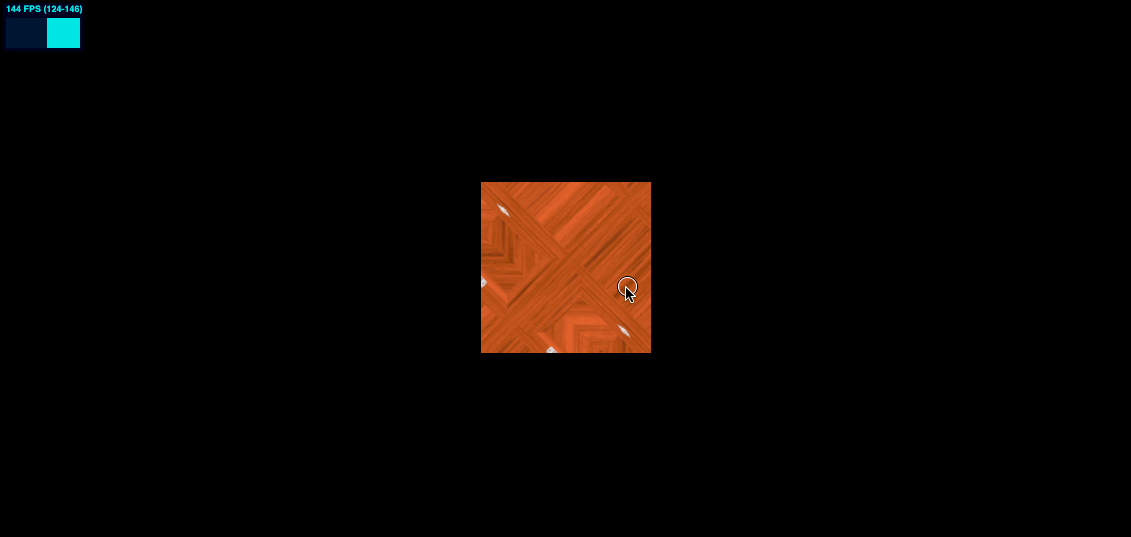
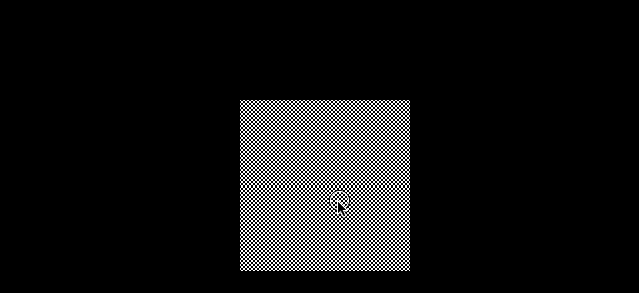
接下来我们使用另一个纹理贴图看看效果
使用 1024*1024 的棋盘格子图片

const colorTexture = textureLoader.load('../assets/textures/checkerboard-1024x1024.png')
colorTexture.minFilter = THREE.NearestFilter
可以看到非常多的摩尔纹
这种场景可以尝试更换不同的 minFilter 去解决
Magnification filter 放大滤镜
- THREE.NearestFilter
- THREE.LinearFilter 默认值
这些常量用于纹理的magFilter属性,它们定义了当被纹理化的像素映射到小于或者等于1纹理元素(texel)的区域时,将要使用的纹理放大函数。
我们换一个纹理素材 8*8 的非常小的一张棋盘格子图片

默认值 THREE.LinearFilter 的效果如下
const colorTexture = textureLoader.load('../assets/textures/checkerboard-8x8.png')

设置为 NearestFilter 的效果如下
const colorTexture = textureLoader.load('../assets/textures/checkerboard-8x8.png')
colorTexture.magFilter = THREE.NearestFilter
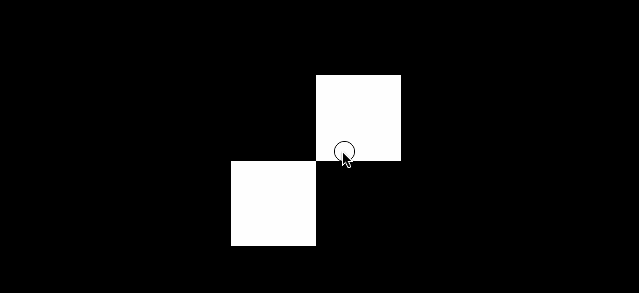
当我们使用非常小的纹理时,这个放大滤镜就显得非常有用了
再看一组对比 minecraft 风格的立方体

| magFilter 为 LinearFilter (默认) | magFilter 为 NearestFilter |
|---|---|
 |
 |
另外在放大滤镜下 NearestFilter 的性能也会更好。
使用 colorTexture.generateMipmaps = false 这个属性会禁止生成 Mipmaps,缩小过滤和放大过滤都会默认为 NearestFilter。
纹理的格式与优化
体积
- jpg 较大的失真压缩,但体积更小
- png 较小的失真压缩,但体积更大
同时可以使用 tinyPng 工具进行更好的压缩
尺寸
纹理会被存入 GPU 缓存中,同时 mipmapping 的时候,会生成近2倍的图片,因此尽可能让图片小。
mipmapping 的操作是不断的将图片缩小一倍,直到 11 像素,可理解为不停地除以2,所以建议使用 2 的 n 次幂的宽高尺寸图片,如 512512、10241024、5122048 等,如果不是这样的尺寸,ThreeJs 也会帮你优化,但可能会带来额外的性能损耗或渲染问题。
Data
png 支持透明通道,而 jpg 不支持。如果想拥有1个纹理包含颜色和透明度,最好使用 png。png 也会包含更多信息
小结
本节我们学习了纹理相关的知识,知道了如何加载纹理,获取加载进度,了解了 uv unwrapping,纹理的变换,放大和缩小滤镜以及一些简单的纹理相关的性能优化。最后附上网上可以找到的比较好的纹理资源网站。下一节我们将学习研究 Materials 材质。
Textures 资源
本节的 demo 和源码
在线 demo 链接